A common challenge when installing an IP security system is the limitation of Ethernet cabling. IP cameras deployed using PoE technology involve the use of copper network cables such as CAT5e or CAT6 which have a data broadcast boundary of 100m (328ft). While that should be sufficient for a home or small business installation, large-scale installations may require the use of several different connection methods.
The most common method to extend beyond the 100m limit per PoE camera is a PoE Extender. The usual solution involves using a PoE switch with an output power of at least 30W and a PoE Extender every 100m to reboot the data signal. If you have multiple cameras, the cost of a long-range PoE setup can be expensive when you factor in the cost of the extender, and it’s difficult to do in locations where it’s difficult to mount the extender in the middle of the road. This is a guiding manual for setting up a Lorex PoE Switch.
To summarize, there are 3 main steps to set up a Lorex PoE switch:
- Switch planning and installation
- Connecting the devices together
- Deploying setup to host security cameras
Lorex Poe Switch Setup Steps
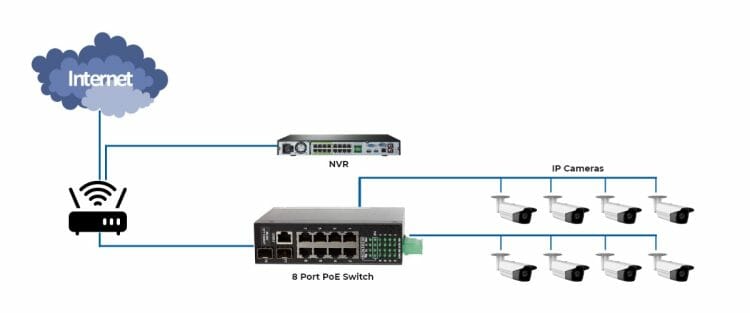
Here is an overview of the steps required to set up an IP camera system:
1. Planning and installing cable runs for the switch and camera is the first thing you should do when installing any type of security camera system.
- Install fiber optic cable (orange line) to connect the two devices PoE switching over long distances.
- Install Ethernet cables (red lines) for each IP camera you intend to install. Click here for a more detailed guide on security camera installation.
- Make sure to have an Ethernet cable to connect the router, NVR, and main switch. (1)
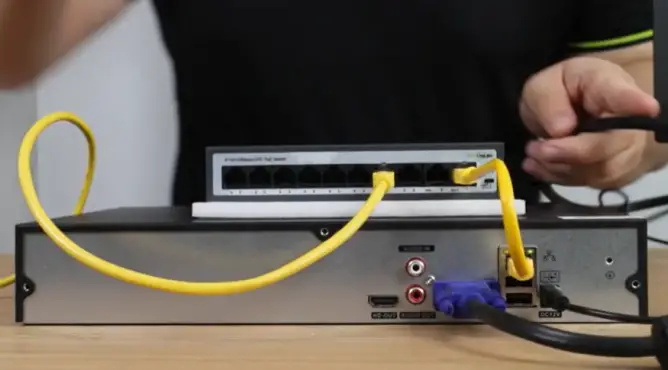
2. After installing the cable, you can start connecting the devices.
- Connect one end of the fiber optic cable to the SFP module and to the first PoE switch. Perform the same operation for the secondary switch. Check the indicator light for the SFP port on each switch to confirm the connection.
- Connect the 1st PoE switch to the NVR through the Ethernet uplink port on the switch.
- Connect the Ethernet cable for the camera to the PoE port on each switch. If the cameras are properly installed with crimp cables, they will power on and connect to the network. Here’s a more detailed guide on how to install security cameras especially in a mobile home.
Note: make sure to use an Ethernet uplink port that does not have the same port number as the SFP uplink port being used. For example, if the SFP port is numbered 17 on the switch, use the Ethernet uplink port 18 to connect the Ethernet cable from the switch to the NVR.
3. You have now successfully deployed the fiber optic network to host the security cameras. The next steps, as fully described in our IP camera system via network guide, include: (2)
- Configuring the IP address for the NVR on the network
- Initializing and seting up unique IP addresses for IP cameras
- Add IP camera to NVR
- Seting up PC software or remote viewing application
References
(1) Ethernet – https://www.businessinsider.com/what-is-ethernet
(2) fiber optic – https://computer.howstuffworks.com/fiber-optic.htm