Most of us have used a DVR or CCTV camera, but haven’t heard much about “Anti-Dither”. In this article, we will help you to understand the concept, and also guide you on how to configure Anti-dither Settings on Lorex Cameras.
Anti-Dither is the amount of time delay that occurs before the DVR starts recording, it can also be thought of as the amount of time it takes something in the image to trigger the DVR to record. The combination of anti-dither, latch, and post record is responsible for the behavior of the motion event after their detection.
The Concept of Anti-Dither in CCTV cameras
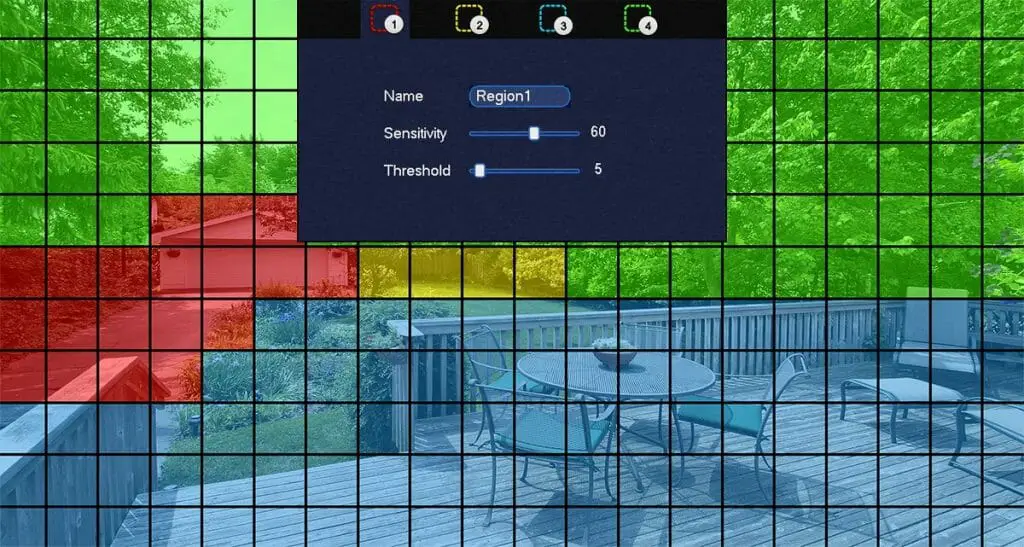
Anti-dither is the time duration in which DVR cannot capture or record any movement. The video recorder records the footage when this period ends. The anti-dither time is assigned by the DVR user and you can set the time to 10 seconds on the DVR. The object has to be in front of the camera to get captured. The object triggers the DVR to capture the footage. One can adjust the anti-dither time. Values range from 5 to 600 seconds. If you set the anti-dither time to zero, it results in zero delays. The DVR, after such a setting, can record any movement that is seen through the security cameras. (1)
If you want to specify how the system works after motion detection on LHV, LNR, or DVR series, go for the anti-dither, latch and post record combination.
During the anti-dithering period, the system boots to record the video. By default, this value has been fixed at 30 seconds. The latch is responsible for determining the alarm output device that remains active after the detection of motion. Post record is responsible to determine the time duration for recording the video after the detection of motion.
How to configure anti-dither?
If you want to configure the settings of anti-dither, latch, and post-record, you can follow the below-mentioned steps:
- Select “Live View” for a quick “Menu”.
- Click on the main “Menu” and then click on the “Settings” icon.
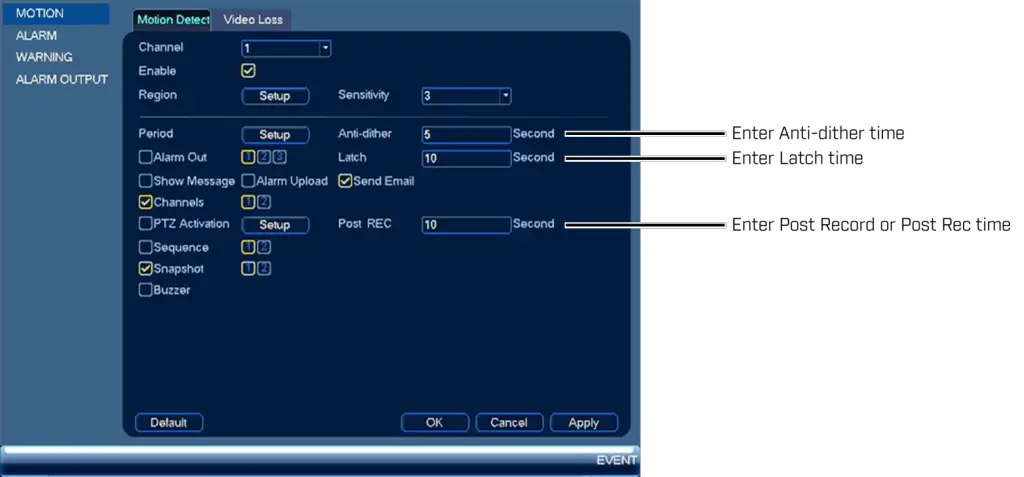
- Click “Alarm” —> “Motion” or “Event” > “Motion”, then click “Motion detection”.
- Select the channel you want to configure from the Channel drop-down menu. (2)
- Make sure the “On” checkbox is selected.
- Enter Anti-dither, Latch, and Post Record times in seconds.
NOTE: On some firmware versions, the Posting Record may be written as Post REC time. Click Apply to save the settings, then click OK to exit the mode.
You may check here for legal information on when and how you can record audio or video using your security camera. Until our next article!
References
(1) movement – https://parade.com/645657/marysauer/4-simple-micro-movements-to-stay-flexible-and-banish-aches-and-pains/
(2) drop-down menu – https://blog.hubspot.com/website/html-dropdown