A DIY solar-powered wireless security camera is one of the best alternatives to a store-bought security camera. Making a DIY solar camera is easy if you know the right method. This detailed guide will help you build a DIY security camera powered by solar energy.
Quick Steps to building a DIY solar-powered security camera;
- Step 1: Choose the right Voltage battery and connect it to the solar charger controller.
- Step 2: Connect the solar panels with the solar charge controller
- Step 3: Install a wireless security camera like Reolink into the apparatus
- Step 4: Construct a weatherproof box around the system to protect it from all weather elements, including snow.
Below I will go through more details on completing this process yourself, starting with the power source!
Materials Required
Before making a DIY solar security camera, you must get a few things. You can get these from any major e-commerce site or your local hardware store.
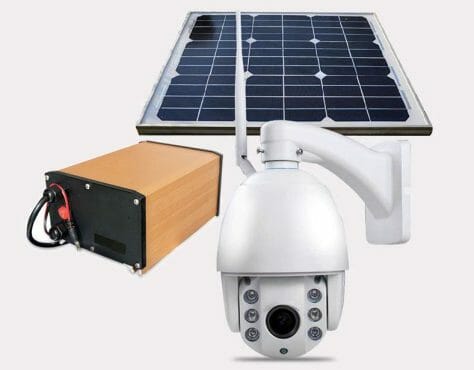
- Solar Panel: The solar panel will be used to power the camera.
- Security Camera: Purchase any wireless security camera of your liking, such as a Reolink camera.
- Battery: Make sure to buy solar batteries that can be quickly recharged. They should store adequate power for continuous recording and monitoring.
- Battery Enclosure: Your battery can be exposed to harsh weather. To protect it from this, choose a good quality electrical enclosure for complete protection against weather conditions.
- Solar Charge Controller: You’d need a solar charge controller to regulate power within the system.
Power Requirements
Before beginning the project, you must get the main components that eventually form the solar-powered security camera.
Gauging The Supply Of Power
Power is rated in watts, while voltage is rated in Volt or V. Before buying the components, ensure that you gather information on power rating and use it to calculate the size requirements for both the battery and the solar panel for your security camera.
For a camera that works on 12 VDC, you’d need a 12V battery. Likewise, if the camera works on 24 VDC, it will require a 24V battery.
Battery Lifespan
Your choice of battery would determine the efficacy of the security camera system on many levels. You have two options for this kind of project: Li-Ion and Deep Cycle Lead Acid. Both options have their fair share of benefits to offer. (1)
The lead-Acid battery is more of a budget option, as it is cheaper than Li-Ion. Although, the battery lifespan offered by Lead Acid is relatively less than what Li-Ion offers. Lead Acid would render good service for 2 to 5 years, while Li-Ion can be trusted with about 5 to 9 years of service. In addition to this, Li-Ion also happens to change faster than its competitor.
You’d have to pay considerably more for the wide-ranging benefits offered by Li-Ion.
While buying the battery, make sure to purchase a weatherproof battery enclosure to protect it from environmental elements.
Solar Panel Size
Choosing the right size of solar panels is just as important as getting the power supply voltage right.
First, you need to ascertain the peak sun hours in your region. This would vary from area to area, so you might want to conduct local research.
For optimum charging, choose a solar panel with either an equal voltage output to the battery or greater. For a 12V battery, a 12V solar panel should be bought.
The Solar Charge Controller
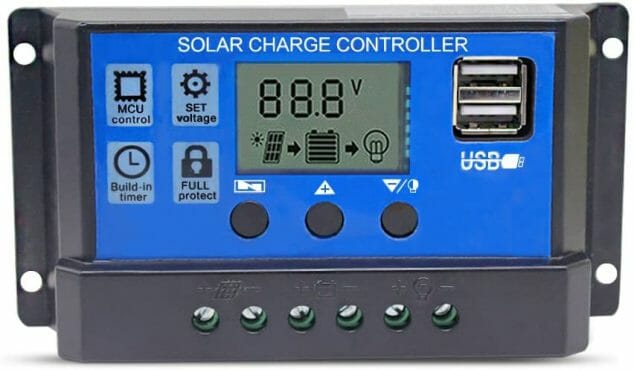
A solar charge controller regulates the power in the battery and the voltage and current input from the solar panel. This component strikes a balance in the system’s charging and is placed right between the battery and the panel. It prevents the batteries from being overcharged by regulating the rising voltage input from the panel.
The criteria for choosing the ideal solar charge controller is that the current rating is more than the short circuit current after considering the safety factor. Short circuit current is the maximum current that a PV panel can produce. (2)
Selecting the Solar Cable
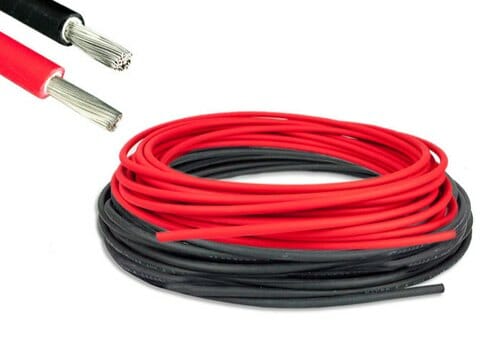
Solar cables will be the medium that connects the solar panels to the battery. It ensures that the current from the solar panels is connected to the battery with minimal loss.
Factors such as cable length, cable-cross section area, and materials used to make the cable should be considered to choose the ideal cable.
The general rule of thumb dictates that the longer the cable, the more resistance would be—similarly, the larger the cross-section area, the smaller the resistance.
Finally, regarding materials, you have choices between Copper and Aluminium. Aluminum has more resistance, as opposed to copper. Copper cable is ideal.
The ideal cable size could be calculated using the RENOGY online calculator. For this formula, you’d need four particulars, the information which could be found on the specification sheet on the solar panel.
The four particulars are Solar Panel Operating Voltage, Cable Length from Solar Panel to Battery, Solar Panel Operating Current, and Expected loss in percentage. Make sure you choose a cable whose voltage grade matches that of the maximum system voltage of the solar panel. This will ensure optimum regulation of power and lead to the improved efficiency of the solar-powered camera.
Preparing the Power Cord
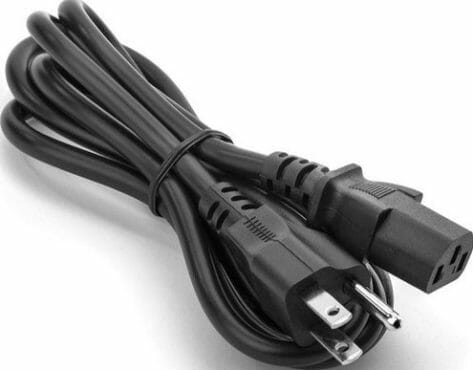
Using another DC male jack, you’d also need a cord that supplies power from the battery through the charge controller. It would need to be installed without snipping the original extension cable.
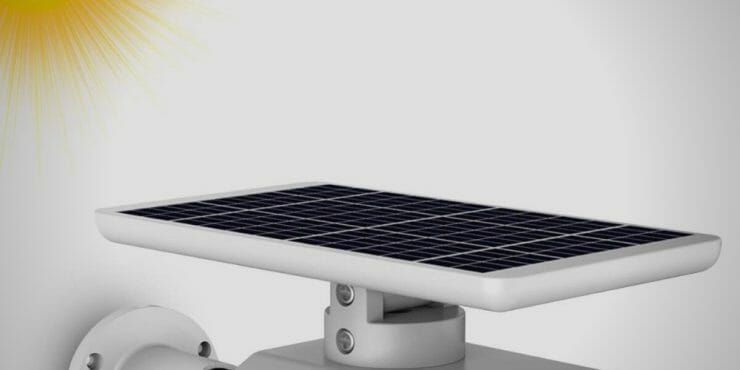
Installing the Solar Panel
Now comes the part where you work on the project’s MVP, the solar panel. Since the panel will derive its power from the sunlight, you’d need to face the panels directly toward the sunlight to receive maximum power.
To maximize the panels’ exposure to sunlight, you can consider pointing them toward the equator. Make sure to clean the surrounding areas regularly.
Wiring
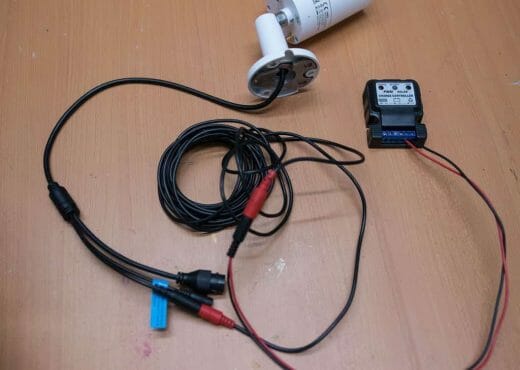
The final step is to make all the right connections using the wires to get the solar-powered camera up and running.
Be extremely careful while linking the wires, as one misstep could bring you back to square one. Collect all the wires and cables before you begin working on this project phase.
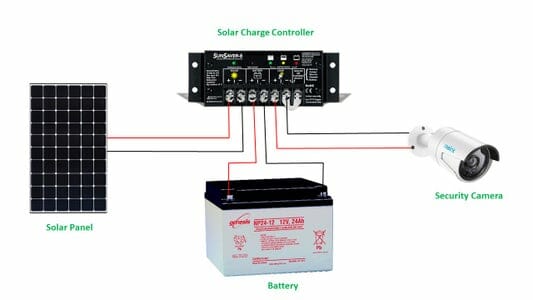
Here are the three wiring connections that you would need to secure for the proper functioning of your solar-powered security camera.
1. Connecting the solar charge controller to the battery
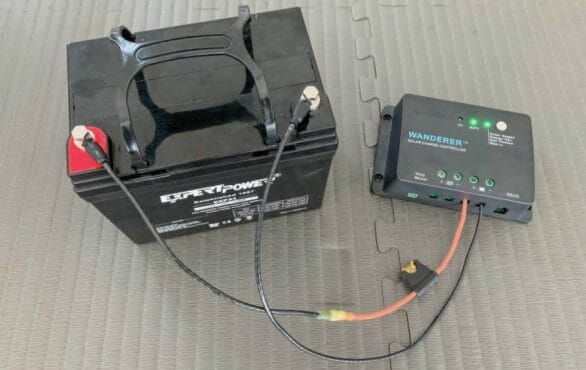
The solar charge controller, the main regulator, would first need to be attached to the 12V battery using a suitable cross-section cable. The battery’s positive terminal would need to be connected to the positive terminal of the solar charge controller. Similarly, connect the negative terminals.
2. Connecting the solar panel and the solar charge controller

Next, you’d have to connect the solar panels and the solar charge controller. Like the previous step, you’d be required to connect the corresponding positive and negative terminals.
Once the connection is made, and the panels receive sunlight, the charge controller will indicate the “battery charging” signal. That would tell you if all the wiring was done properly or not.
3. Connecting the security camera to the load terminals
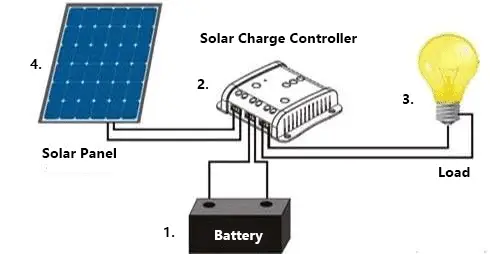
Now that you’ve set the base, you can make the final connection, that of the security camera and the load terminals of the solar charge controller. Repeat the exercise of connecting the corresponding positive and negative terminals.
Voila, you’re all done. Once the system gets some juice through sunlight, you can get your security cameras up and running and begin monitoring and recording the events in front of your house.
Additional Factors to Consider
Factor 1: Voltage of your Solar Security Camera
Managing the power supply is important while making a DIY solar system.
The thing to consider here is the battery’s power supply voltage. It needs to be on the same level as the wireless security camera you want to install. For instance, if you’re planning on installing a 12V camera, it needs to be paired with a 12V battery. The cameras will get cooked if you pair a 12V camera with a 24V battery.
Likewise, if a 24V camera is paired with a 12V battery, it won’t work due to an inadequate power supply. This is why it is imperative to know the power voltages of both devices before building a DIY solar security camera.
Factor 2: Battery Backup Options for Your DIY Solar Cameras
While your solar security camera would get its power from the sunlight, some backup options should be implemented to ensure that the camera continues to monitor and record even when it is cloudy, when the sun is not shining, or at night.
For this, you’d first need to gauge the battery lifespan of the surveillance system. To ensure that power is efficiently pumped at all times necessary, purchase rechargeable solar batteries that can be recharged fairly quickly to keep the system up and running. Choose the right solar panel kit, which can be bought from Amazon or a local hardware store.
On average, you can expect the battery of a wireless security camera powered by solar energy to carry on for 4 and 6 months in standby mode. Although, this figure could be easily pushed much higher, depending upon several factors, including the user.
Factor 3: Protection From Weather Elements
Since solar-powered security cameras are meant to be placed outside, they will inevitably be prone to the elements such as rain, wind, storm, dust, and even lightning. During winter, it can be exposed to excessive snow. Such elements can be catastrophic to the proper functioning of the camera, so you’d have to take some protective measures.
For one, make sure that the camera you buy is waterproof. Next, build protective housing for your solar panel and the whole system, such as a weatherproof box. Lastly, ensure that the security camera and other components are regularly cleaned and dusted.
Factor 4: DIY Solar-Powered Security Cameras Cost
DIY solar-powered security cameras are not cheap, so prepare to pay a bit now for more future savings later. On average, you can expect this whole project to cost anywhere between $400 and $1000. The figure could also be more than this range, depending upon the quality and the brand of components you’ve bought. This is especially true for solar-powered cellular cameras that work on 3G/4G/LTE networks due to the additional service costs. (3)
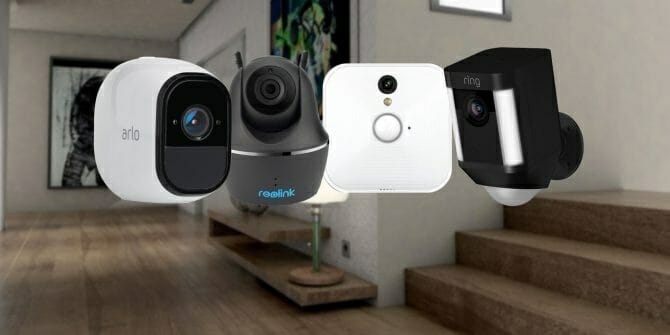
Best Wireless Cameras To Choose For The DIY Project
You’d have to choose the ideal wireless security camera to complete your DIY solar security camera project. Here are two of the many options to choose from. Depending upon your budget and your unique requirements, you can blindly buy any of these two, although, Reolink has a better track record in working as a DIY solar camera.
1. Reolink
Countless home surveillance owners trust the Reolink wireless camera due to its high specifications and ease of use. Reolink camera is a petite and easy-to-install device indoors and outdoors, without having to deal with the hassle of many wires. It offers effective pixels, 4.0 megapixels to be precise, and supports both day and night viewing, thanks to the IR illuminator that can cover a distance of about 30 meters. The best part is the Reolink offers good flexibility in installation, which means it is a perfect wireless camera to be installed in your DIY solar surveillance project. It is compatible with all the components required to build the DIY security camera.
2. Arlo Security Camera
Arlo can also be used for the DIY project. Arlo Pro 4, for instance, can be installed without the need for wires, making it easier for you to integrate the camera with the rest of the apparatus you create. The small size would also offer much flexibility in where you decide to install it. Moreover, since the solar camera would be exposed to harsh weather, it would be much easier to protect a small camera like Arlo from rain, dust, storm, and snow. It also comes with night vision and a 160° diagonal viewing angle. So, it will fit right into the solar camera apparatus and render good performance in terms of recording.
FAQs
Can security cameras function with no electricity?
Whether or not a security camera will work without electricity depends upon what kind of camera we are speaking of.
If it’s a CCTV camera, then no. All CCTV cameras require electricity to function. However, many other security cameras can work using a battery or other power source.
Reolink Argus 2 uses a rechargeable battery to function, so it doesn’t matter if your home has electricity. If you connect the camera to a solar panel, it will work just fine without electricity.
A solar camera uses the energy provided by sunlight to keep the system running. So, it doesn’t require electricity to work as long as the solar batteries are charged. This will allow you to capture images and videos during prolonged power outages.
Although, some cameras also have backup batteries, which can be turned on during power outages. To that end, there are plenty of ways to ensure that your security cameras keep recording and monitoring even when the electricity goes out.
What is the expected lifespan of solar-powered security camera batteries?
The duration of how long the battery of your security camera would last depends on several factors, including the battery you have and the total usage of the security camera.
On average, you can expect the battery to last about 4-6 months on standby. An average set of rechargeable batteries would take 6 to 8 hours to charge and then run for about one week to 3 months, with no additional charging. Of course, these are only some average figures that we have pulled. The precise figure would vary depending on how long the camera has actively recorded.
Is it mandatory to install a solar security camera in direct sunlight?
The solar battery-powered camera gets its juice from the sunlight, so you’d need to keep the solar panels in direct sunlight. The more direct the sunlight is to the panels, the more power. You can point the panels to the equator for more efficacy.
Although, even if no direct sunlight falls onto the panels, you’ll get adequate power. Even on cloudy days, you can expect your camera to work due to the UV rays that can push through the clouds and power up the system, though it won’t be as efficient as direct sunlight.
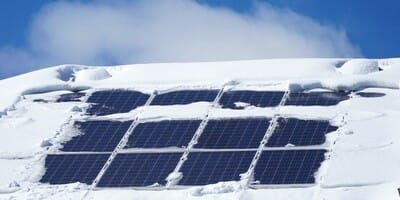
Can I expect solar-powered security cameras to function even in winter?
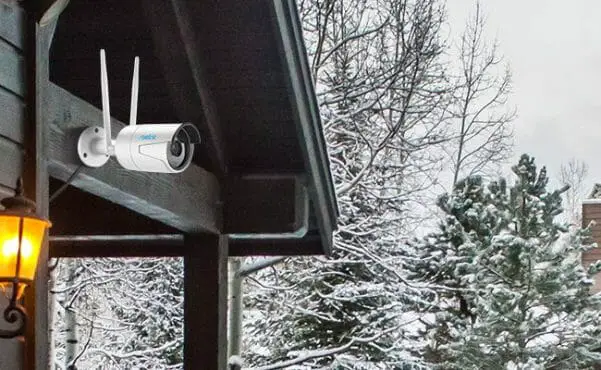
Solar security camera undeniably works best under strong sunlight, which you can only expect during the hot summer months. So, you might wonder if the system would work during winters when sunlight is relatively sparse. The answer is yes. Your solar-powered security camera would work fine in winter, even when it’s snowing, and better sometimes.
This is because the snow on the ground could play the role of a mirror and provide more energy output. This is if the solar panel itself is not covered in snow. If that’s the case, then the proper functioning of the camera would be hampered. On days when there is no snow, you have nothing to worry about.
Even so, you could take certain measures to ensure that the proper functioning of the surveillance system is not hindered. You could protect the panels by building a weatherproof protective cover around them. The cover would wick away as much snow as possible or enough to ensure the continued functioning of the camera.
To Buy or To Build? (Advantages & Disadvantages)
Solar battery-powered cameras have an assortment of benefits. For one, you could give yourself the healthy challenge of assembling everything independently. Moreover, you’d get much flexibility on the specifications of the system. So, you get to make the calls on how the camera eventually performs.
In addition, a solar security camera also eliminates the hassle of dealing with long wires, and these cameras can be installed even in remote locations. However, solar cameras are not completely disadvantage-free. There are a lot of cons that you need to be wary of.
For one, solar camera kits can be really expensive. Not that the store-bought cameras are not expensive, but if you’re choosing to make your system more specifically advanced, then you’d have to cough up the extra money. However, in the long run, you’d notice that a DIY solar camera is less of an expensive investment than a store-bought camera. This is so; the store-bought camera can only pump so much power. You’d have to pay the price if you want the camera to render more power. Meanwhile, in a DIY solar camera, you can choose the number of panels and decide how much energy you want to utilize. Moreover, by using a DIY solar camera, you could also relieve yourself of not paying a monthly subscription fee, which is a must in some store-bought cameras, especially the ones that work over a cellular network.
Wrapping up
Security cameras can give you a sense of security and ensure that you and your family are safe from intruders. If it’s solar-powered, it’s even better since you can manage the battery and not worry about frequent power outages. Thanks to solar camera kits, the best part is that you can easily build your solar security camera without professional help.
References
(1) Li-Ion – https://www.sciencedirect.com/topics/chemistry/lithium-ion-battery
(2) PV panel – https://www.sciencedirect.com/topics/engineering/photovoltaic-panel
(3) 3G/4G/LTE networks – https://www.verizon.com/articles/network-speeds-101-comparing-3g-and-4g-lte/