Lorex security cameras are among the easiest to install. I usually recommend Lorex products, including their security cameras especially if you are a DIY person. This article goes through how you can configure the Lorex recording settings.
Follow these steps to configure Lorex recording settings.
To access the ‘Quick Menu,’ right-click on the ‘Live View’ on your Lorex App. Then, tap the ‘Main Menu,’ and then press the camera icon. Next, select Recording> recording tab. You can configure the Lorex recording settings to your preferred modes. Once satisfied, hit ‘Apply’ to save the selected settings. Hit ‘OK’ to exit.
Options for Configuring Lorex Recording Settings
The LHV/LNR/NVR systems have a couple of recording settings capable of configuration. Some of these settings include resolution settings, compression settings, FPS (frames per second) settings, etc. (1)
The Procedure for Setting up Lorex Recordings
- To access the ‘Quick Menu,’ right-click on the ‘Live View’ on your Lorex App.
- Tap the ‘Main Menu,’ and then press the camera icon.
- Select Recording> recording tab.
- You can then configure the Lorex recording settings to your preferred modes.
- Once satisfied, hit ‘Apply’ to save the selected settings.
- Hit ‘OK’ to exit.
Handy Tips for Navigating Through the Recording Settings Window
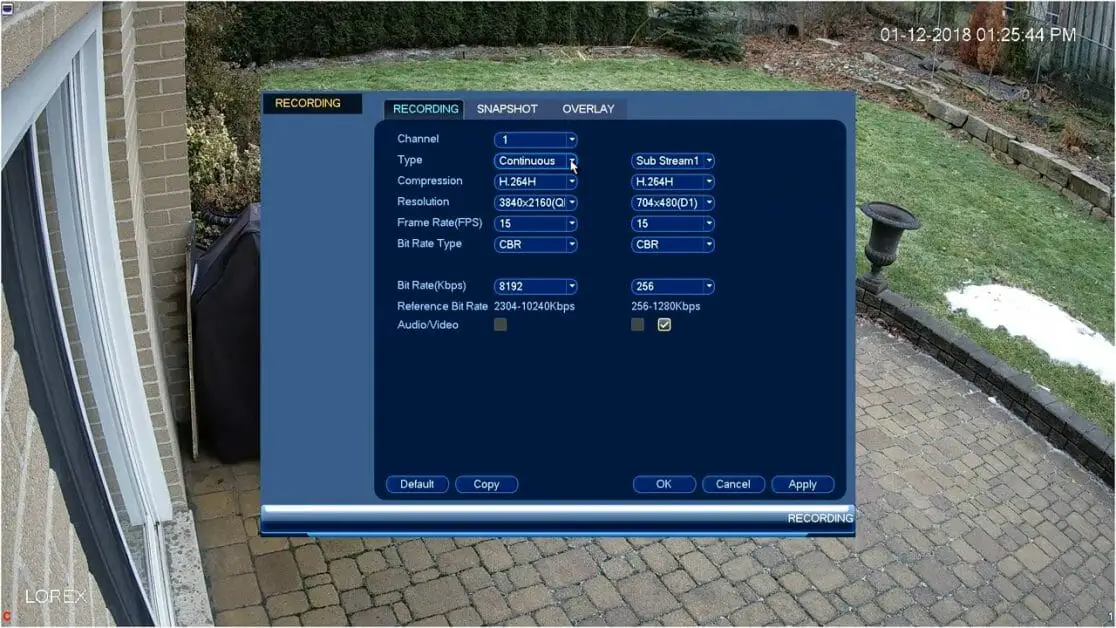
To configure the mainstream settings, use the left column. To configure substream settings, use the right column. Below are other valuable tips that will help you quickly navigate through the window.

- Channel: choose the channel number you wish to configure.
- Type: choose the type of recording you prefer from the three available options, namely ‘Alarm,’ ‘Motion Detect,’ and ‘Continuous’ recording. If you want your security to exhibit motion detection, do it at this point. Check out the advanced motion detection settings at your disposal.
- Compression: what type of video compression do you want? This is where you get to choose how condensed your videos will be and which compression format they will use.
- Resolution: choose the most suitable resolution for your security camera to record. Pay attention to night vision settings while choosing Lorex security camera resolution.
- FPS (frame rate per second): Choose the FPS that every stream will record.
- Bit Rate Type: You need to decide the bit rate type of your Lorex security camera. Choose Variable Bitrate (VBR) or Constant Bitrate (CBR) to achieve this. However, for individuals using VBR, you will be required to choose between one to six quality levels – lowest to the highest quality. (2)
- Bit Rate: You must choose the Bit Rate for every recording stream.
- Audio/video: as the terms suggest these options allow you to choose between mainstream audio recordings or substream video recordings.
- Audio format: here, you determine your security camera’s format to record audio. You may want to give G711a a chance.
- You must have sufficient hard disk drive space and bandwidth to opt for a higher FPS, resolution, or bit rate. This means having in place a sufficiently large additional hard disk drive.
As you can see, the Lorex camera recording setup is doable. The configuration process of Lorex Recording Settings offers you a world of possibilities as far as operating your security camera is concerned. Whether you want advanced motion detection or have the opportunity to access cameras remotely, you get what you want with the Lorex configuration settings.
Take a look at some of our related articles below.
- How to tell if a security camera is recording
- Best night vision security cameras
- How to reset Lorex DVR
References
(1) compression – https://www.britannica.com/science/compression
(2) Bit Rate – https://filmora.wondershare.com/video-editing-tips/what-is-video-bitrate.html
Video Reference