
Do you want your Alexa device to address you by your name, but you don’t know how to make it happen? Fortunately, there is a way around that. Keep reading this quick guide to learn how to get your Alexa to say your name.
Things You Will Need
You will need your Amazon Alexa devices such as iPad, iPhone, or Android device, an Amazon Alexa app installed on the device, and an amazon echo. The entire name-changing process should take about ten minutes. (1)
Setting Up Alexa to Say Your Name
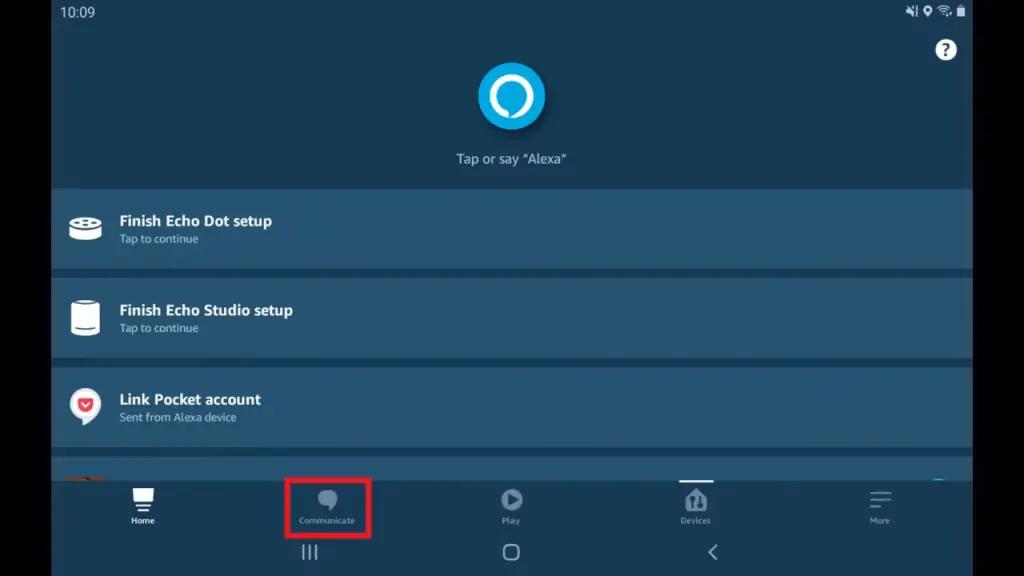
- Open your Alexa app on one of your Amazon Alexa devices. In the menu at the bottom of the screen, locate the “communicate’ button and tap it. Doing this brings up the communication screen.
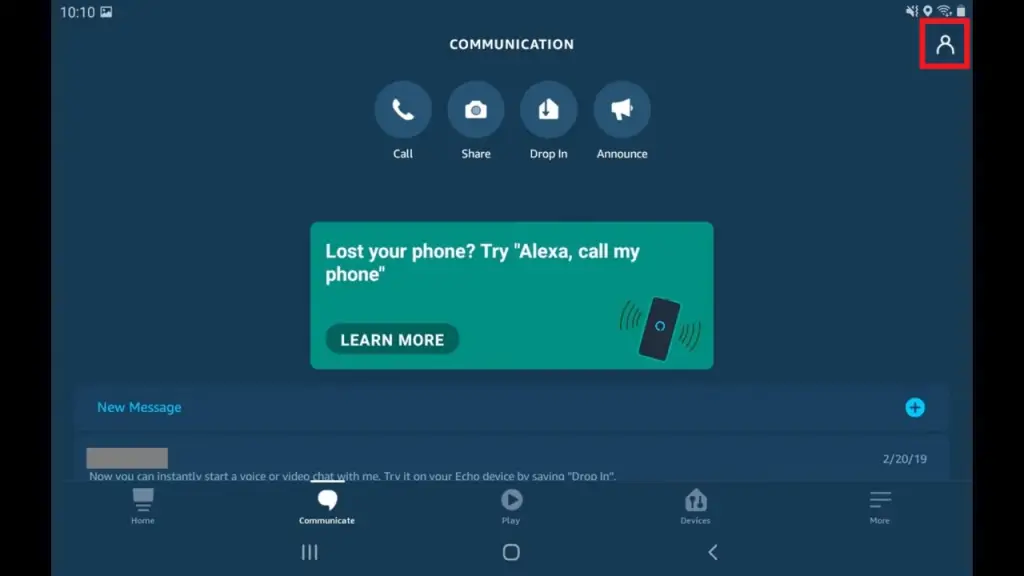
- Do you see a person’s silhouette at the top right corner of your screen? Tap on it for the contacts screen to open.
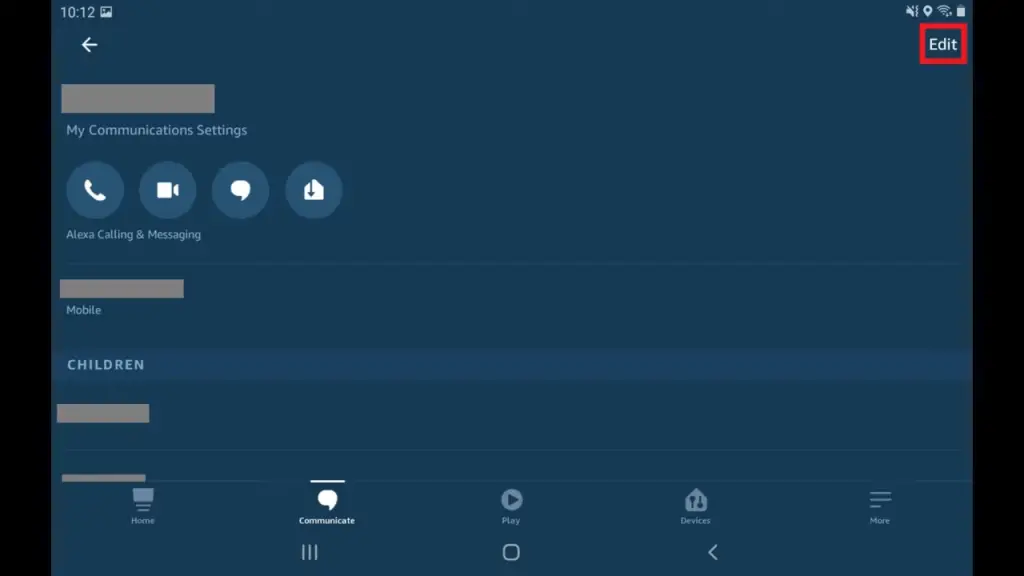
- Hit the name at the top of the list to show the ‘My Communication Settings’ for your account.
- Press the ‘Edit’ button on the ‘My Communication Settings’ screen – in the upper right-hand corner of the screen. This should lead you to the ‘Edit Contact’ screen.
- On the fields linked to your first and last name, tap them to include how you wish your amazon Alexa devices to address you. Once you’ve written the name, press the ‘Save’ button on the screen’s upper right corner.
- That’s how to get your Alexa to say your name. Moving forward, your amazon Alexa devices will be addressing you by the name you’ve saved.
- Confirm if the name change is successful by saying, ‘Alexa, what’s my name?’ Your Alexa app will respond, ‘I’m talking to (your currently preferred name). This is (name of the account owner)’s account.’
The Voice Profile
Have you thought of creating a voice profile on your Alexa app? To ensure that your Amazon Alexa app recognizes your command – especially when there are other members in the household – consider creating your voice profile.
It’s simple. Launch your Alexa app on your device. Hit the ‘More’ icon at the bottom toolbar. Go to ‘Settings,’ ‘Account Settings,’ and then ‘Recognized Voices.’ This is where you create your voice profile.
If you created the voice profile a while back and wish to go through the process again, go to ‘Recognized Voices’ and press on ‘Manage Voice Profile. Hit ‘Delete voice profile’ to generate a new one on the next screen.
If you are building a voice profile for the first time, hit the ‘Create a voice profile’ button and follow the on-screen instructions to the end. On the ‘match voice profiles’ step, you will need to assign names to each voice, especially when there are other people in the house besides you.
One of the things worth thinking about when changing your name is that there are consequences as it might affect other Alexa app features. For instance, while communicating to other Echo users, it will say that the messages come from the name you’ve chosen. Therefore, you might want to be careful as you change your name. Choose a name you are comfortable with, especially when using nicknames, as it will show on your public profile. (2)
To delete your voice profile, you may click here for the guide. You may also check other Alexa learning guides we’ve listed below. Until our next article!
References
(1) name-changing process – https://www.findlaw.com/family/marriage/how-to-legally-change-your-name.html
(2) things worth thinking about – https://thoughtcatalog.com/brianna-wiest/2016/05/101-things-that-are-more-worth-thinking-about-than-the-person-who-didnt-choose-you/