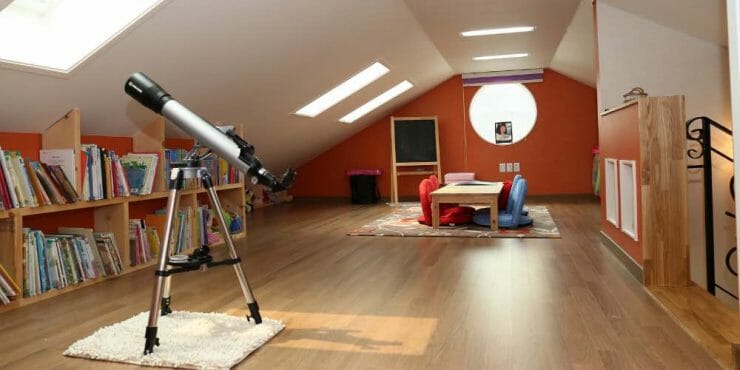
Knowing how to run security camera wires through the attic can be great for people who like to do projects themselves at home. The good news is that you don’t need to be a professional to run wires. Following the right steps and with the help of some common tools, anyone can run security camera wires through an attic and set up a security camera system.
You probably figured that the attic is the most suitable place to run security camera wires through if you’re here. Although the attic complicates things a little bit, following the proper steps and with some tips, you can run the wires without any problems.
What Tools You Will Need to Run Security Camera Wires Through the Attic
Here is a list of the tools required to do the job.
- A pencil/marking tool: for marking the different places to drill
- A drill: to drill holes or wires to go in
- Tape measure: to measure distances and wires
- A fiberglass pole or a chain: to fish wires through the attic and out of the walls
- A crimper: to attach connectors to the wires
- A headlamp and a flashlight: to see in the dark
A fiberglass pole is a thin rod that fishes the wires through the attic and out of the walls. You only need a crimper if you wish to set up the camera system yourself. Alternatively, if you don’t have a crimper, you could have the connectors crimped to your wires by someone who has one beforehand. (1)
How to run security camera wires through the attic
Once your tools are ready, it’s time to get to work. Here are the steps you have to go through.
Step 1: Figure out where the cameras and DVR will be placed.
This is an important step, and you have to be strategic here. You don’t want three cameras covering the same area while other areas are not being covered. Some areas, such as doors and windows, must be covered depending on the security cameras’ purpose.
Finally, you must determine where the DVR monitor (if you plan on setting one up) will be placed. It might prove helpful to place the DVR near the attic, which would be easier if you do not wish to add a monitor. (2)
Another thing to remember is to ensure the DVR is not out in the open, especially if you’re setting up a security camera system against robbery. Thieves could destroy the DVR if they could see it before them. You might also want to consider wiring complications while deciding where to place the camera.
Depending on your situation, some camera configurations might be more manageable wiring than others.
Step 2: Mark the Locations and Prepare the Wire
The wires don’t necessarily need to come from the wall exactly where the cameras are. You may use cable concealers for the wire reaching the cameras/DVM from these locations.
Once camera and DVM positions have been decided and the drilling locations marked, you need to know how much wire will be required to connect each camera to the DVM. You can do this using a tape measure.
Remember to include all the distances, including the thickness of any walls or callings the wires will go through and the distance from the surface of the walls to the inlet of the cameras and the DVM.
You will need the same tape measure to measure and cut the wires of the appropriate length. It’s a good idea to cut the wires a little longer as you can always shorten them, but you could lengthen a short wire. It’s better not to attach connectors because they may get stuck in drilled holes and complicate things.
In the attic, you have to figure out where you’ll need to put the wires for them to go inside the walls and come out from the desired location.
Step 3: Make appropriate holes at the marked locations.
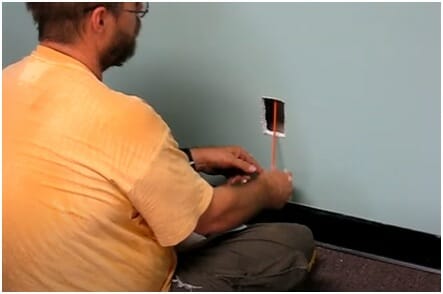
Depending on the location, you might want to make different sizes of holes. You also can install a socket as the outlet of these wires.
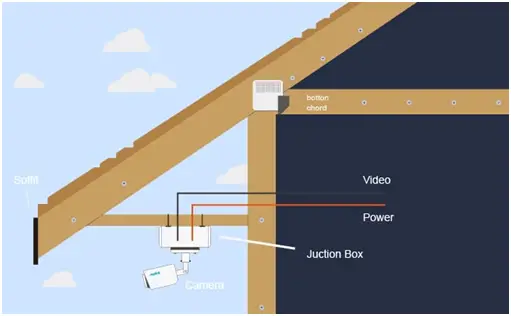
You will need to drill larger holes where multiple wires are coming in or going out. This is particularly applicable to the DVM.
It would be best to ensure that the holes are big enough for wires and the chain (in the next step) to get through.
For the walls, the holes need to be at least two square inches (about the size of a small socket), so you can pull the wires in easily.
Step 4: Attach your wire to a pole or a chain
A fiberglass pole is a flexible yet solid thin rod used to pass the wire from one place to another from inside the walls.
You can use any other light, flexible rod if you have one, but if you don’t use it, you may also use a chain.
Just tape one end of the wire to one end of a chain, and you’re ready for the next step. We need the chain because a wire alone will have trouble going down the insides of the walls.
Step 5: Fish the wires through the marked holes
This step is a critical one. Since you’re running the wires through the attic, you first have to know where each wire should go down to get to where it will come out from the place inside the wall.
If you carefully mark your locations, you should have no trouble. Just drop the chain attached to the wire down from the hole in the attic and pull the chain along with the wire from the socket-sized hole in the room.
If you try to put the wire in through the attic directly, you’ll see that the wire curls and has trouble getting to the bottom. You don’t need to have a chain attached if the hole in your wall is near the top.
Step 6: Setup the Cameras and the DVR
Now that the wires have been installed, you can add connectors to the wires using a crimper. This is also the step to place all the cameras and the DVM if you haven’t already.
You may also want to use cable concealers to hide the wires running outside the walls.
Once all this is done, and all the data cables and power chords have been connected, your security system is ready to turn on.
Tips and some things to keep in mind
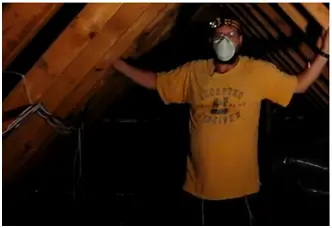
- It can be pretty hot in the attic, so you might want to go to the attic early in the morning.
- Use a headlamp and a flashlight if its dark in the attic
- Be careful walking on the attic floor and try to only step on the beams
- If you make the socket-sized holes in the walls first and then drill the holes in the attic, you might be able to see the light from the hole in the wall from the hole in the attic. This way, you can confirm you’ve drilled the hole in the attic at the right location.
- You don’t want to drill a hole in the roof, so use a measuring tape and make diagrams to determine where to drill in the attic.
Conclusion
Running security camera wires through an attic is a complex task, but it can be done competently with proper tools and following appropriate steps. You will easily find most of the tools needed in your toolbox and will have run a few, if any, errands during the process.
You have to be precise and careful while doing the task. It would be best if you also considered the conditions of the attic before going up and while you’re up there.
References
(1) fiberglass – https://cen.acs.org/materials/inorganic-chemistry/s-fiberglass-does-delicate-material/96/i38
(2) monitor – https://www.dummies.com/computers/pcs/computer-monitors/the-different-types-of-pc-monitors/