
Having a security camera or alarm system is pointless if your doors are not secure. Some doors cannot be locked or they do not come with a lock. There can be other scenarios where locks are flimsy or just not secure enough. To get past these issues, you need an alternative way to lock your doors. So, today I’m hoping to give you a fun and useful guide to locking your door with a fork.
In Summary, to lock your door with a fork lock, you should first, position the fork in the latch hole. Then, mark the depth of the latch hole on the fork, and use a vice to bend the prongs 90° from the marked position. Then, cut off the fork handle. Then Insert the bent fork prongs inside the latch hole and close the door. Finally, insert the separated handle into the gap between the middle prongs.
When Should I Use a Fork to Lock a Door?
Locking a door with a fork can be helpful for several different occasions. Here are some everyday situations where you can use a fork lock as a door jammer.
- If you have a non-functioning backroom door, a fork lock can be handy to keep the door closed.
- Budget hotels, restrooms, and rental places do not have proper security. You might have to deal with non-working doors. So, remember to use a fork lock door option.
- You can use this fork lock as a second level of security. For instance, even if you have a properly working lock with a door handle, using a fork lock will make buglers’ and home intruders’ life much harder.
4 Step Guide on How to Lock Your Door with a Fork
Assembling the dinner fork door lock is not a difficult task at all. All you need is functioning tools and proper execution. Here are the tools that you need for this procedure.
Tools Needed
- A Bench Vice (If you’re strong enough you can bend it yourself)
- Metal saw
- Hammer
- Permanent marker
- Grinder(optional)
Step 1 – Choose a Suitable Fork
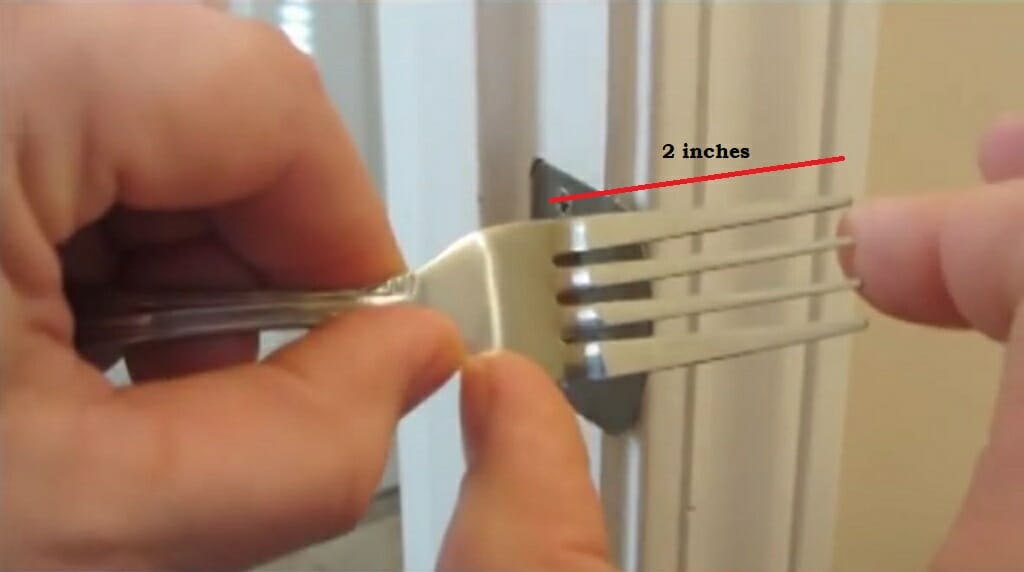
Choosing a suitable fork is important for assembling a fork lock. While choosing a fork, make sure that it has a 0.75 – 1-inch gap between prongs. Also, the prongs should have at least a 2-inch length. Most importantly, choose a fork that has a tapered handle.
Step 2 – Mark the Depth on the Fork
Then, take the fork and put it inside the latch hole. You can observe that some parts of the prongs are now inside the latch hole. Mark that depth on the prongs by using a permanent marker. During this step, accuracy is a must.
Step 3 – Make the Necessary Adjustments to the Fork
Now it’s time for some adjustments. Here, first, you should bend the prongs from the marked line. Then, cut off the handle. Both of these tasks are vital for the overall success of the fork lock.
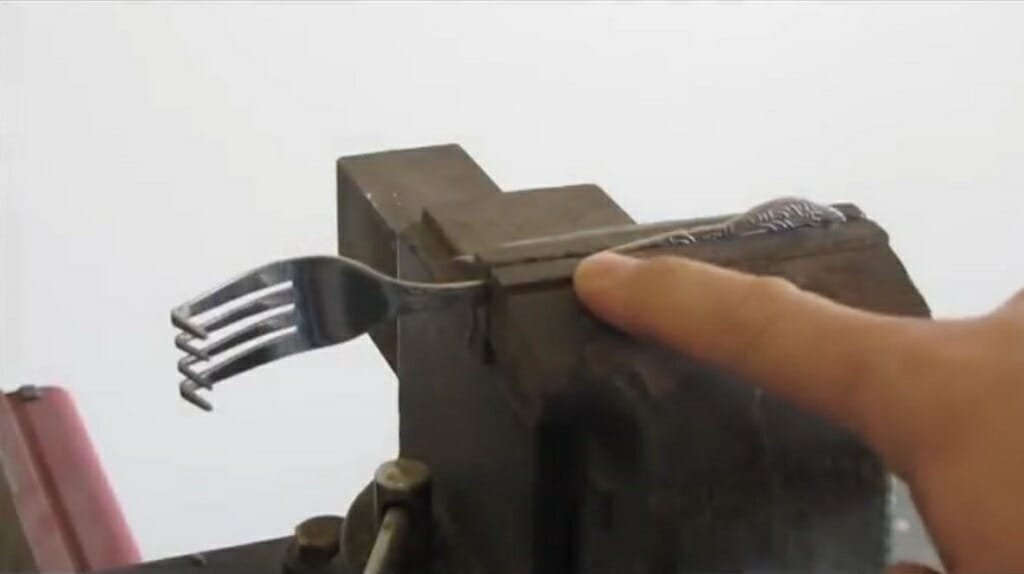
Bend the Prongs

For this, you will need the hammer and the vice. First, position the fork as shown in the above image. Remember to tighten the fixed jaw and the movable jaw. If you are not familiar with a bench vice, here are some detailed instructions.
How to Use a Bench Vice?

Usually, a bench vice is equipped with a fixed jaw, moveable jaw, jaw plate, and handle. There are more parts besides the above four. But, for this tutorial, learning about those four parts is more than enough.
You cannot move the fixed jaw. But, you can use the handle to move the moveable jaw. So, position the fork on the jaw plate and hold it there. Then use the other hand to rotate the handle until the moveable jaw gets fixed to the fork.
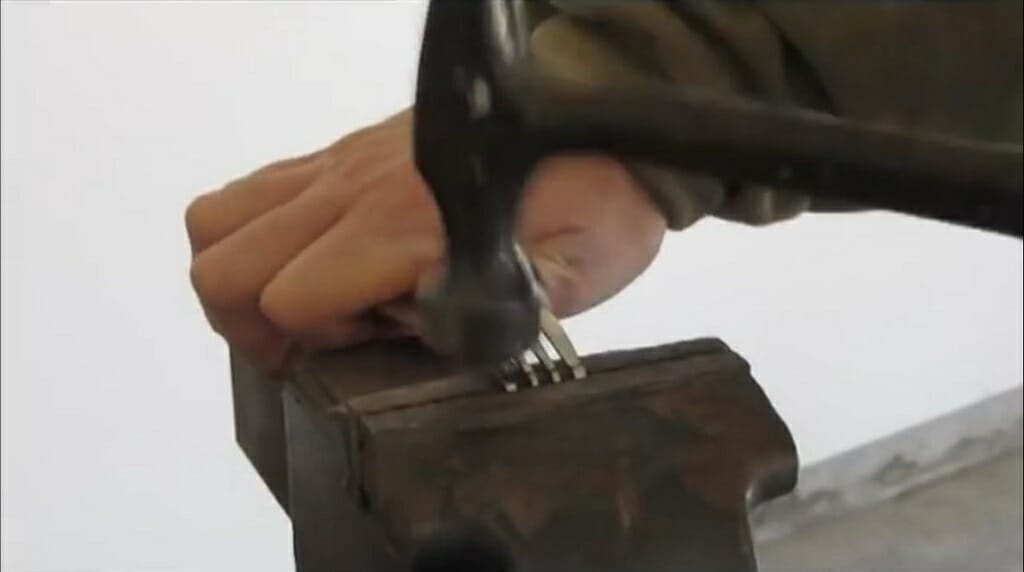
Now, use the hammer to bend the prongs from the marked line.
Make sure the angle is 90°. Don’t hit the fork too hard. You might break it. So, be gentle while swinging the hammer.
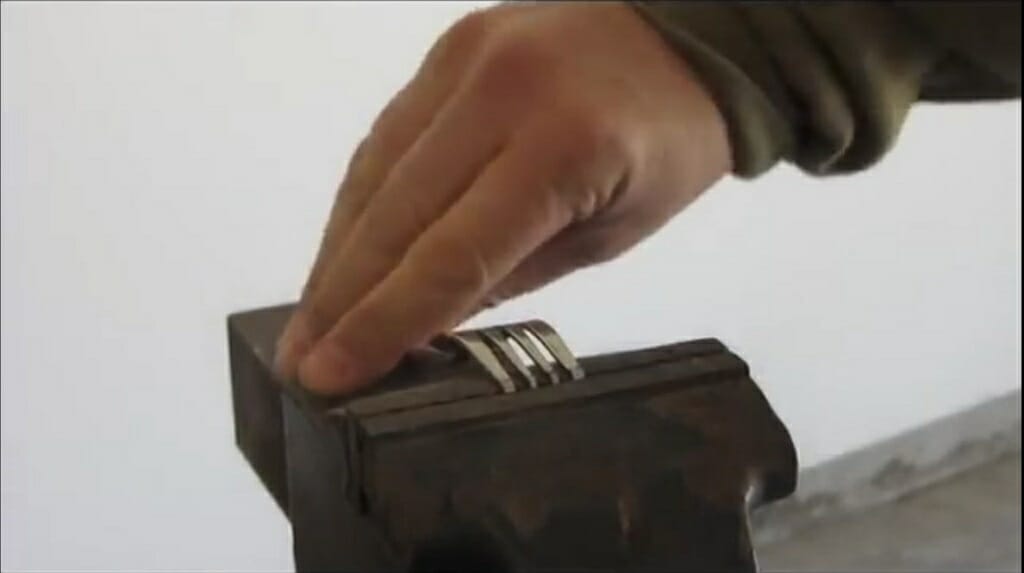
Cutoff the Fork Handle
Now position the fork like in the image shown above.

Take the metal saw and cut off the handle. After cutting the handle, you must check the separated handle with prongs.
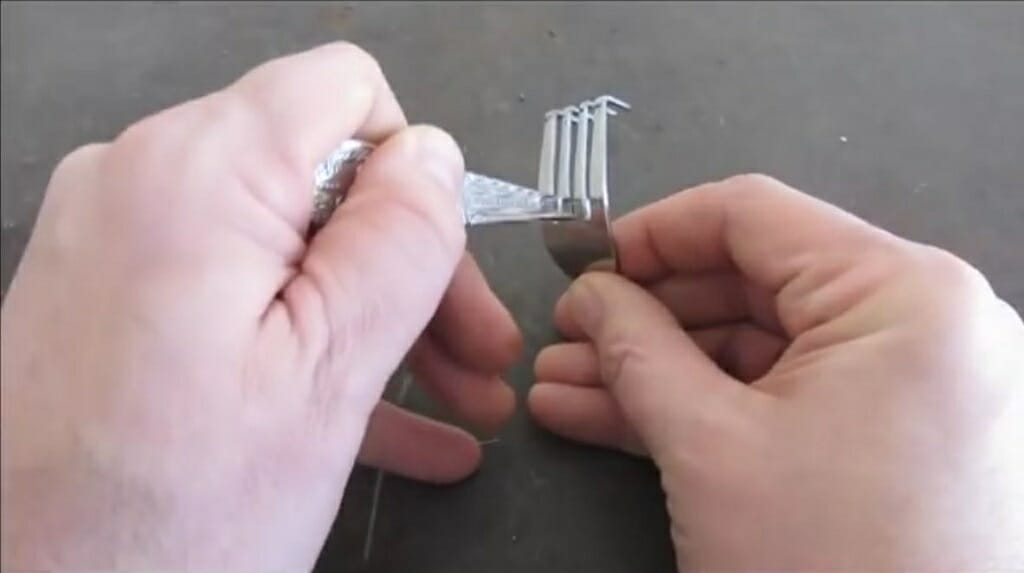
So, try to slide the handle into the gap between the middle prongs. If the handle slides through the space, everything is ok. If not, you might have to grind the handle using the grinder.
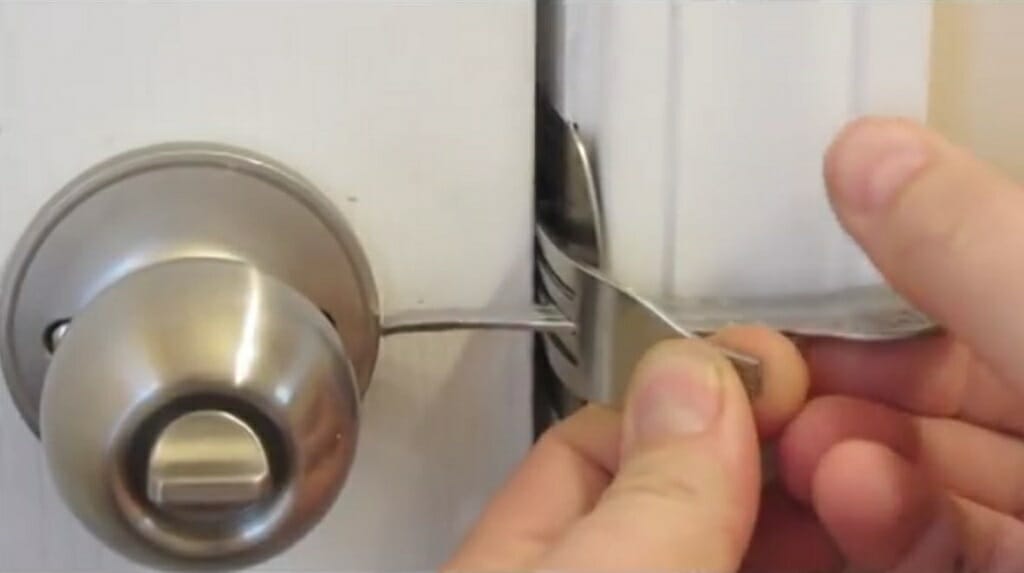
Step 4 – It’s Time to Position the Fork Lock
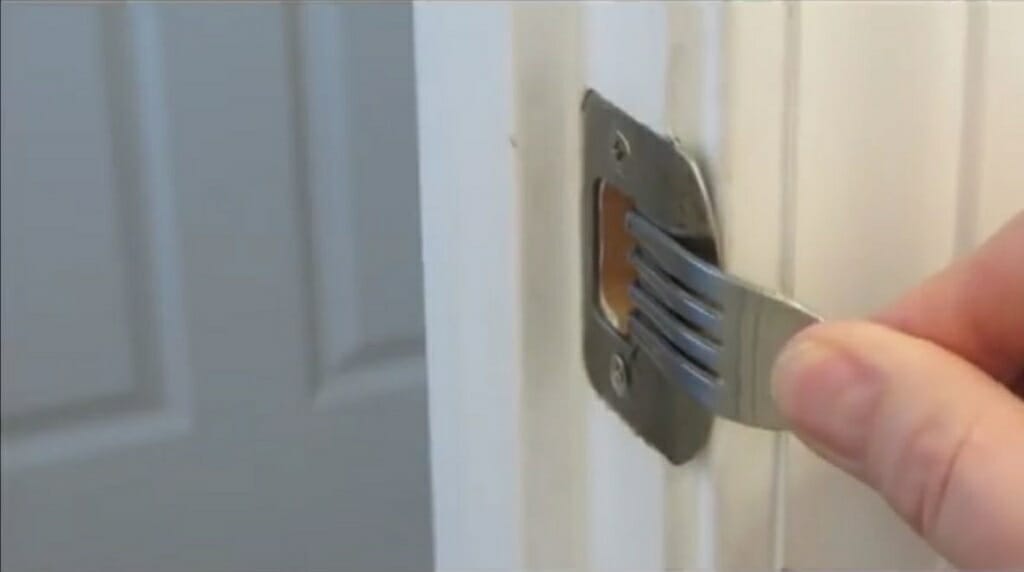
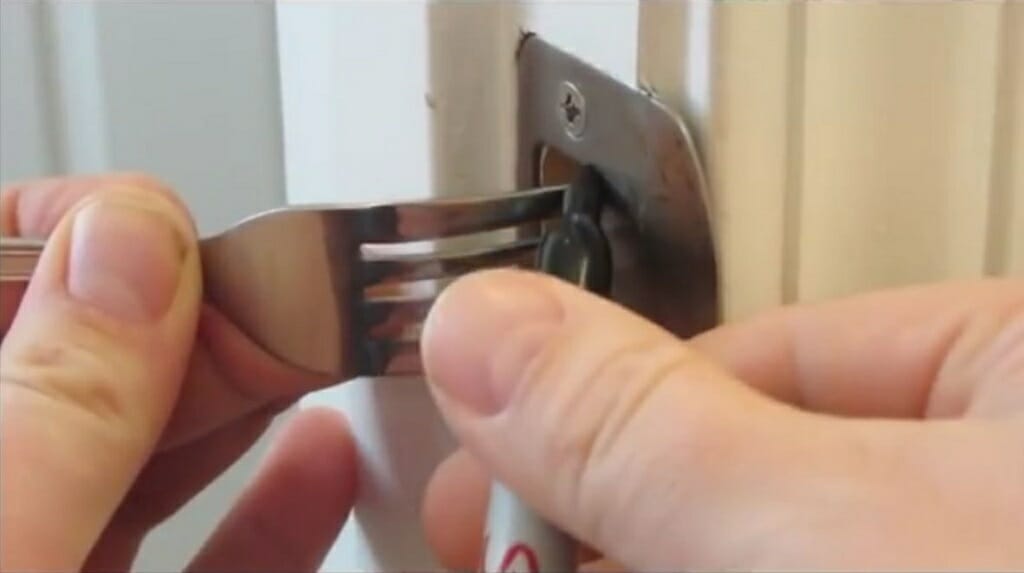
Next, insert the bent prongs inside the latch hole. The other part of the fork should come out like in the above image.
Then close the door.
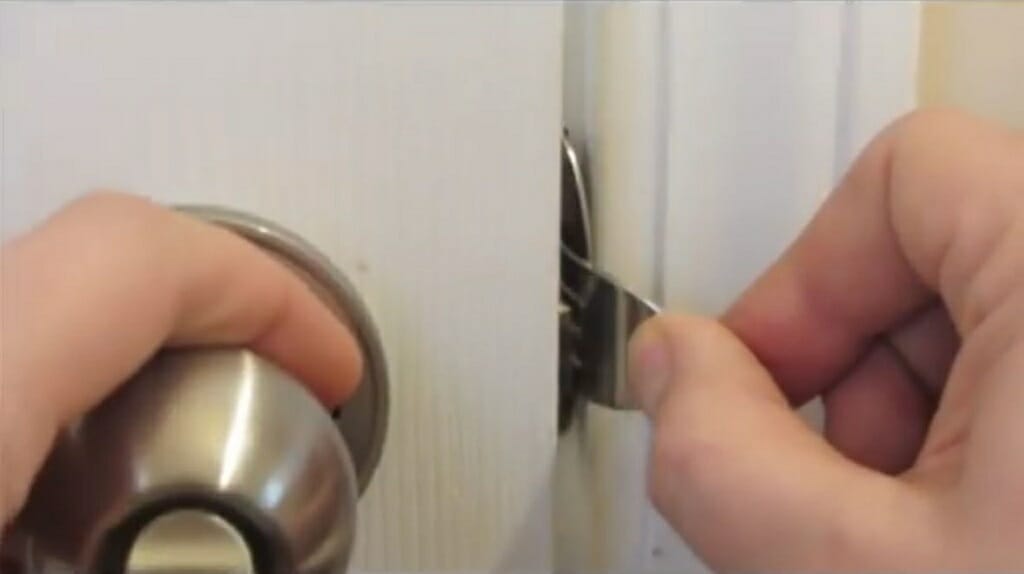
Finally, insert the fork handle into the gap between the middle prongs. Now, the door cannot be open from the outside or the inside.
Wrapping Up
Assembling a fork door lock can be helpful for lots of situations. It is a low-budget door lock that is more effective than other door jammers. This is a DIY project that takes around five minutes.
Take a look at some of our related articles below.
References
(1)
(2)
Video References
Phil Crockett
AnthonyJ350